Alien & Its process..
Iv found it really hard to get the alien finished for the deadline! With Maya not being my strong point in this course i found it really hard to even model the alien let alone having to animate it. In this blog post I will explain my process, show some screen shots of my progression and different parts I struggled with, explain some problems I had on the way and what id change if I had more time and could start over.
In my previous post about the Alien I said that I was struggling with the edge loops tool and that what we where asked to do was just a refresher on how to model, boy was I wrong!! It turned out to be a lot harder than just modelling, for me it was a lot harder anyways. I ended up in total starting over around 7 times! 6 from scratch and once from the skeleton part of the project.

This is what my alien looked like when I had finally finished modelling it! Its not in a smooth preview view and it is X-rayed but you will see the proper finished, textured alien at the end of this post. The Hardest thing for me while modelling was the face because I couldn't quite seem to get it right especially with the split edge looks and figuring out where they should all go!
These two images are of when I had started to create the skeleton (rig) for the character which allowed it to move. I had to re-do this stage twice because if you look on the second picture I have a random joint in the middle and then the right arm wasn't parented properly so I thought instead of trying to find the problem it would have been easier to just start from scratch with the skeleton. The first time round i found it rather difficult to complete the skeleton but when i did it the second time round it was a lot quicker and I completed it in about half the time!

These two images are of my model alien textured. I left this stage quite late on and I wish I hand't because seeing him textured makes him more enjoyable to look at and. To create the texture of my alien and have it all nice and neat, I had to do what is called a UV map in unity, this is where you take a front projection of the geometry and and then split up each park of the it i.e the head, arms, hands, feet, legs and torso. Then I had to take a UV snapshot, open it in photoshop simply paint the textures on in photoshop then save into the source images folder in the maya project file that is created when starting a new project. Once it in there you open the hyper shade in Maya and simply load the painted UV snapshot onto a lambert hyper shade then attach it to the geometry of the alien.

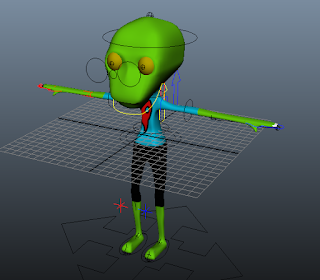
This image is of my skeleton and controls all in place and actually bound to my geometry of my alien which is why it is all colourful! This is the newer skeleton which looks so much better than the first one I did, once I bound it to the geometry it also moved a lot better too, I didn't have ant faults with it to be honest which I was really happy about. In the image above you can also see the controls for the character, I found this the easiest part of making the model but I had a little problem with colouring them in to the L= blue, R= red & Centre = yellow colour scene! The second time round after I had re-made the skeleton they seemed to go tot the right colours straight away so i'm not sure what was wrong the first time!
Overall I am pleased with my process of creating the Alien model but I am disappointed with myself that I didn't properly finish it! I only got to the point where you need to start making the foot point and stuff. Once I started on this bit to be honest I just lost all focus and got really confused. Also because Id left it so late and not completed in the time we where giving I ended up running out of time because f the deadline of the actual cinematic! If I could re do the alien again I would just sit down for a day or two and get the whole thing completed to a decent standard and try to understand things in the process better.


No comments:
Post a Comment