Showing posts with label OUDF505. Show all posts

Thursday, 6 December 2012

FInal Cinematic Pros & Cons..

                    
                     Gloria Kendrick - Game Art & Machinima Project from Phil Jones on Vimeo.

This is a video of our final Cinematic I am really proud of it. I do have a few pros and cons about it though which have come apparent after watching it over and over and getting feedback from other people. The main pro from the video is how well the sound tracks we used in it which where downloaded from 'freemusicarchive.org' went with the animation really well! Im also really please with how the colours from the screen recording haven't changed much. I have a few cons about the video such as after a group review of our videos today and people saying the text in the video doesn't match the film noir theme which never even crossed my mind its just a bit frustrating! But its an easy fix and for the exhibition I will have a much more film nor style font. Iv looked for a film noir font on Dafont.com but had no luck so iv just found the closest one I could to a film noir font style. Another con would be not really to do with the final video but to do with the environment in the video, Iv noticed when if cuts to in the studio scene that there is no light shown coming from the lights on the roof, to correct this all ill have to do is draw the halo on each light so its a quick fix if I want to correct it for the exhibition. 

Overall I am really happy with the outcome of the whole cinematic! I hope you guys enjoy.


Grand Theft Auto Over The Years...


Recently I have been playing GTA: San Andreas on my Mac mainly because I miss playing this game and because I recall it having good in game cut scenes! One of them in particular I like is at the start of the game where you are just getting taught the controls and things you have to do to keep your character in the game 'CJ' alive. 
One of the ways of keeping him alive is by feeding him, one of the cut scenes is that your in this burger place ordering food to eat to keep your health level high and the other character in the game thats showing you where to go, he comes in and puts a gun to the guy on the counter asking for the money in the till... 


This scene caught my eye the most while playing because it is basically what we have to do for this brief, its a one minute machinima with exchange between two characters. Looking at this scene and in fact the whole game in general, the graphic quality, textures, lighting and stuff is actually very similar to the game levels we have made before and are currently making! Obviously the style is different but that depends on the designer and stuff!

While talking about the graphics in San Andreas and how they are similar to the kind of work we are doign at the minute, its got me looking all the Grand Theft Auto games from say one and how much the graphics and game play have changed!! Below are two images of the the first ever Grand Theft Auto made and the latest one which is yet to be released: Grand Theft Auto Five. 

I remember playing the first Grand Theft Auto even though I was very young but I do remember it, I loved it! They did a fantastic job in making it look like a 3D environment even though it was from a birds eye perspective. 


If you look at how much things have changed from Grand Theft Auto 1 to now with the soon to be realised Grand Theft Auto Five they differences are astonishing!! Grand Theft Auto Four was a big change from San Andreas but the new one looks even better and I can not wait to play it! It look so realistic and the map is so big! 


I have watched a video recently on Youtube thats shows the changes in the games of Grand Theft Auto so take a look to get a real idea of how much things have changed in the game industry!! 


Editing & Sound

Once I had all the camera in the right places for the scene and animated in the right was so they move to the positions they needed to be in by the end of that scene, I took a screen recording of the cinematic from unity and started to edit it all together with titles and credits and sound.


So far we only had the sound and quick dialogue from the animatic we made. We decided we wanted to re- record the dialogue to make it fit what we had now even better so we all went down to the big sound room and started to re-do the dialogue of the cinematic while also at the same time watching it over and over so we could get the timing perfect. Once we had recorded the voices, we thought it would be even better for the scene if we recorded the footsteps and shuffles out characters do in the scenes.

To create the footsteps in the scenes we knew we needed it to sound like she was walking on card/wood and not concrete like a normal foot path. Luckily on the day of recording the new sounds Siobhan was wearing heeled boots and Lija was wearing boots so we knew the sounds would work we just had to find something wooden for them to walk on. Down in the sound booths there are ramps for the doors to help people get in and out without tripping, these are made of wood so we decided to slide them together to make a flat surface and use that to help crete the wooden floor sound we where looking for. It worked!! We got great sounds from them and as well as recording the sounds of footsteps on them we decided to record the shuffling Gloria does in the scene too, that also worked great so we where really pleased with the sound outcomes we got. 


The editing software I was using was Final Cut Pro X not the Final Cut we have a uni. mainly because I have it on my laptop so it was easier to edit while at home but also because I have the newer Final Cut on my laptop I use that a lot more for making videos out side of Uni which led me to semi forget how to use the older version quickly and properly. While editing the screen recording together I noticed that when Unity played the animatic it had rather big jump cuts to the next scene, so what happened was is that when one scene had finished the animation would pause then the next one would start but still have a little pause to it. To get past this I just cut out the frames where the pausing and cutting happened to give it a bit more of a smooth cut. It seemed to have worked well. 

Fun in Unity!

My main role in this project was to create the environment and import the lighting and other effects in unity. Once I had created the set/city in Maya, I gave it to Siobhan to use it as a reference for the length of animation. While she was doing that I decided to start playing in unity with skyboxes and cameras. The images below show a camera angle I was interested in working on in one of the actual unity scenes. I also put in a day time sky box just to get an idea of what it will look like with a skybox in the scene. 


Once Siobhan had finished the first few scenes for the animation, I asked for the city back so I could save it as an FBX file format in Maya so I could import it into Unity and actually start making the scene come to life. The images below show what the lighting looks like int he scene. We wanted a very film noir look to the scene so instead of making the light white I tried to make them a little more orange/yellow. I also added a torch cookie to the light so they had a bit more of a lamp kind of look to them and then I also added an area light in the middle of both lights to show off the glow of the light a little bit more! I think it works well and I couldn't wait until we had the textures on the building, roads and paths to see what it actually looked like all together. Having Gloria in the scene while I was doing the lights helped too though, one because it helped with the colour of the lights and how it would effect her colours and two because it helped to work out the intensity of the lights.


The image below is on the set/city with its full textures, effects, lighting and sky box. I think it looks really good and looks really film noir. The textures for the building roads and paths where done my Lija so click here to see them. With the lighting I hadn't really change it as it worked well with Gloria before the textures got put in but once they where put I think it looks even better! Lija did a really good job with the textures on the buildings and the lights, especially with the lights because the colour of the lamp matched the lights so well. She also made some little extra details for the environment like newspapers and floor grates which really add to the environment, you can see them by clicking the 'click here' early in this post.


Below is the environment in which you can actually walk about in and get a real feel for it! 

-->

Alien & Its process..

Iv found it really hard to get the alien finished for the deadline! With Maya not being my strong point in this course i found it really hard to even model the alien let alone having to animate it. In this blog post I will explain my process, show some screen shots of my progression and different parts I struggled with, explain some problems I had on the way and what id change if I had more time and could start over. 

In my previous post about the Alien I said that I was struggling with the edge loops tool and that what we where asked to do was just a refresher on how to model, boy was I wrong!! It turned out to be a lot harder than just modelling, for me it was a lot harder anyways. I ended up in total starting over around 7 times! 6 from scratch and once from the skeleton part of the project. 


This is what my alien looked like when I had finally finished modelling it! Its not in a smooth preview view and it is X-rayed but you will see the proper finished, textured alien at the end of this post. The Hardest thing for me while modelling was the face because I couldn't quite seem to get it right especially with the split edge looks and figuring out where they should all go! 


 These two images are of when I had started to create the skeleton (rig) for the character which allowed it to move. I had to re-do this stage twice because if you look on the second picture I have a random joint in the middle and then the right arm wasn't parented properly so I thought instead of trying to find the problem it would have been easier to just start from scratch with the skeleton. The first time round i found it rather difficult to complete the skeleton but when i did it the second time round it was a lot quicker and I completed it in about half the time! 


These two images are of my model alien textured. I left this stage quite late on and I wish I hand't because seeing him textured makes him more enjoyable to look at and. To create the texture of my alien and have it all nice and neat, I had to do what is called a UV map in unity, this is where you take a front projection of the geometry and and then split up each park of the it i.e the head, arms, hands, feet, legs and torso. Then I had to take a UV snapshot, open it in photoshop simply paint the textures on in photoshop then save into the source images folder in the maya project file that is created when starting a new project. Once it in there you open the hyper shade in Maya and simply load the painted UV snapshot onto a lambert hyper shade then attach it to the geometry of the alien.


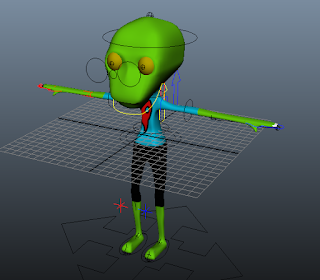
This image is of my skeleton and controls all in place and actually bound to my geometry of my alien which is why it is all colourful! This is the newer skeleton which looks so much better than the first one I did, once I bound it to the geometry it also moved a lot better too, I didn't have ant faults with it to be honest which I was really happy about. In the image above you can also see the controls for the character, I found this the easiest part of making the model but I had a little problem with colouring them in to the L= blue, R= red & Centre = yellow colour scene! The second time round after I had re-made the skeleton they seemed to go tot the right colours straight away so i'm not sure what was wrong the first time! 

Overall I am pleased with my process of creating the Alien model but I am disappointed with myself that I didn't properly finish it! I only got to the point where you need to start making the foot point and stuff. Once I started on this bit to be honest I just lost all focus and got really confused. Also because Id left it so late and not completed in the time we where giving I ended up running out of time because f the deadline of the actual cinematic! If I could re do the alien again I would just sit down for a day or two and get the whole thing completed to a decent standard and try to understand things in the process better. 

Wednesday, 5 December 2012

Films & Characters that relate...

When our group where first thinking about what we wanted to create for this project we each gave our own idea about what we think we should do and then our idea just kind of moulded together! 

Everything we decided on in my eyes related these images and filmed clips shown below. For each one I will explain why and how it related to either the characters or the environment...


Elastigirl  from The Incredibles movie: 
Elastigirl for me was related to our character Gloria Kendrick mainly because of her height but also because of her hair style too. As soon as out group started to describe our character Gloria, Elastigirl popped into my head straight away. To start with we decided we wanted her to be really tall and clumsy, my initial thought was "like Elastigirl from The Incredibles" so I pitched this across to Lija and Siobhan and they liked the idea so the height of Gloria was styles against the height and elasticity of Elastigirl. 


Gilbert Huph from The Incredibles movie: 
The other character in our Cinematic is Moustache Man who I feel is a similar character to Gilbert Huph, Mr. Incredibles boss in The Incredibles movie. Gilbert Huph is a very short angry man who is considerably smaller than Mr. Incredible (AKA: Bob Parr). When we where thinking about the second character for our cinematic I thought it would be a really good idea to have a 'boss' kind of character as Gloria in in P.I (Private Eye) training. Instantly I thought of Gilbert Huph as I know the concept of having a much shorter character than gloria would be a funny concept because of her height of around 6 foot.


Spy Kids 3 Opening Scene:
Once we starting thinking about the story of the cinematic and we decided we wanted to have a P.I my instant thought and relation to this was the first scene from the Spy Kids 3 film where Juni Cortez is narrating over the footage shown at the start explaining that he's a private eye etc. This also helped a lot with the dialogue and the sound tracks for our own cinematic. 


Men in Black Training Scene:
Once we had figured out what kind of story we wanted, a training facility for an agent. I started looking at and thinking of past films iv watched that have some sort of training scene in them, the best one I could think of that related to what we wanted to do was the Men In Black training scene, where Will Smith is going through training to become an agent with the Men In Black! In this scene he is sent into a room with flashing strobes, a gun, a cardboard city and cardboard aliens popping out at him and he had to decide which needs shooting and which deserves to live. The idea of having a cardboard city linked really well to whats we wanted to do so while designing it I mainly thought of this scene from this film! Below is an image of the environment our cardboard city.... 


Wednesday, 21 November 2012

The Set


Here are a few images of the set modelled in Maya and the lamp posts that will in the set for our Machinima.... 


Monday, 5 November 2012

Elevations & Floor Plans

Top

Bottom

Here are the elevations and floor plans on our city model for our Machinima. I have used Google Sketch up for this because I find it easier to scale it to measurements right and scale because of little character 'Susan' is the to help with scale. I have only placed the smallest and the tallest buildings in this as the size of the other buildings in between doesn't really matter. I have scaled out the roads and paths and added the measurements in. 

Measurements:
Tall Building: H-15m, W-7.25m, D-0.25
Small Building: H-9.20m, W-7.25m, D-0.25m
Lamp Posts: H-5m
Paths: H-0.15m, W-2.25m
Roads: W-10.00m
Studio Floor: 50.00m x 50.00m

Animatic

This is the video of the animatic I made of our story for our Machinia, they drawings where done by Lija and the sound tracks where sources by Siobhan. I just added some sound effects and timed the images right. Let us know what you think? 

Friday, 2 November 2012

Our Story Board

This is a picture of our storyboard that we made and pined up in our flat when we first started thinking about the story for our machinima cut scene. You can't see if very well but the black lines and writing are the camera movements I added so we can visualise the story better. Lija will be posting up a more detailed story board soon which will be easier to see.

Wednesday, 17 October 2012

Machinima Module - Cardboard City


For the module OUDF505 ( Game Art and Machinima) we have been placed in groups of three and have to make a 1 minute long cut scene from a game. I am with Siobhan Parkhouse and Lija Jursins, click on their names to see their blogs. 

As each person in our group has their own strengths in different aspects on Film, Games and Animation I was given the task of directing the cut scene once everything is modelled etc and also as I enjoy modelling environments and using Unity I was given the task of modelling and designing our environment/scene for the cut scene. 

When im thinking of an enviroment in my head I have a way on looking at a surface like a desk and actually visualising it in 3D right there infront of me, this only really started happening towards the end of last year when I watched this video....


It was made by AndrewMFilms on Youtube and basically it is him making a theme park like you can do on the PC game Roller Coaster Tycoon but in actual real life! Its fantastically done and since watching this I visualise stuff in 3D in front of me like a hologram. Its kind of strange but works for me. This is one of the reasons why I have created this cardboard mini set of the set we want to use for our cut scene we are creating. It is also helping me to get the right camera angles and and positions of cameras for when I come to actually place them in Unity. 

The idea of making a mini cardboard cut out of our environment it really handy because the actual environment we will be using will be made from cardboard because the story behind our cut scene is that our character is a P.I undergoing training and this scene is of her starting off the training process in what she and the audience think is a real city when in fact its just made from cardboard. 

Here are the stages of me building it: 
- This is just a quick sketch of the layout I had in my head. After this I then started again with actual measurements on a fresh piece of cardboard and began building....
- Here I am just putting in footpaths to mark out the road and space I have to put the buildings in... 
These are the first sets on flat cardboard buildings I put in, they are around 12cm wide each but no of them go over 30cm in height. Iv trued to keep it all to scale the best I can but it was hard while thinking of out main characters height of 6 foot. -


- I have also just used triangular rest plates coming of the cardboard to hold it up like it would actually be in an actual fake studio set. 

Here are just some more images of the set/environment taking shape with more building etc. - 

- I particularly like shot like this where the camera is at a level where it seems like you are in the actual city model. 
These Images are of the cardboard city finished and with little toy cars and a little toy girl in it just to get scale while doing practice shots and other camera angles, I have also added little street lights to help work out the lighting for when I start modelling the fake city in Unity. 


This ii really going to help with camera angles, movements and positions when filming the cut scene and I can't wait to get started actually modelling the read think in Unity, every time I look at this model new things I could add to it keep popping into my head like steam greats and little news stands and stuff. Should be good! 

Saturday, 6 October 2012

Sack Boy

After starting on Maya again after the summer and me not really having time to go on it and practice I have been really struggling with getting back into the swing of it with all the tools etc. I spoke to my my friend Tom from our course who suggested following a tutorial on Youtube how how to model Sack Boy from Little Big Planet. Here is the link to the tutorial. it is a four parter but unfortunately the guy who made the tutorial never got round to making the fourth one so its not fully completed yet. 

Here are some images of the different stages of making it.... 


This is the blueprint to Sack Boy which the tutorial on Youtube provides you with...


I took the blueprint into Photoshop and cut it up so I had the front and side separate, then took it into Maya and placed them on the front and side perspective so they looked like this....
This is to help while modelling so I have a guide as to where the edges need to be etc. 

In these images you can see what it looked like after modelling the head with edge looks and using the vertex mode to shape the edge loops into the right place....  
 In these images it shows the body of Sack Boy modelled, To make the body I did it a bit different to the tutorial because I extruded it out of the head by clicking on the bottom face right at the bottom of the head and pulling/extruding it down toward the bottom of the body on the image. Then I just shaped it all again using the edge loop tool and the vertex mode.....


This is an image on the arms added to the model in the perspective view. On the tutorial the guy said he couldn't model hands but said to give it a go so I did and this was my outcome. It actually wasn't as hard as I thought it was going to be! Once I had made one arm I just duplicated it and moved it to the other side and positioned it off the background image....


This is a screenshot of the model in its final state as it is in the tutorial video, I have added the legs by making a cube and shaping it using the vertex mode and edge loop tool again as before. The legs where the easiest part but I think that maybe because I have done the same thing for all the other parts and just got used to it. I did the same again with the legs as with the arms and just modelled one leg and them duplicated it and moved it to the other side and in the right place. 


Over all I am very pleased with the model of Sack Boy I have created, it has helped me to understand and get used to Maya that little bit more! I will try and complete Sack Boy by adding his eyes, mouth, zip, UV mapping and texturing him. I will post another blog when I get round to completing him. 
It was a shame that there isn't a part four but I am going to keep checking on the guys channel to see if one pops up!